Databases can be accessed in Python through a database connector where you can write SQL queries as you do in a SQL client. Writing these queries can be complex and error-prone–especially when you are using a language like Python where all data you deal with are objects or relations between objects .
Writing queries just like you write objects makes connecting to databases really easy. You can do that by using an ORM (Object Relational Mapping) tool like SQLAlchemy ORM. SQLAlchemy is a Python toolkit and ORM that helps you write SQL in a flexible way. One way to do so is to write SQL in an object-oriented paradigm.
Another useful feature of using an ORM, in general, is that it adds guardrails to a database. That’s because schema relationships are enforced because relationships, as mentioned above, are treated as objects. For example, if you have a relationship between two tables and you define a foreign key in a table to refer to the other, this predefined schema won’t allow anyone to break away from it.
SQLAlchemy has two components:
- SQLAlchemy Core – which is similar to traditional SQL. It views your data in a schema-centric view.
- SQLAlchemy ORM – which provides a high-level abstraction to write SQL queries in Python objects , and this is our focus in this tutorial.
Using SQLAlchemy ORM will make you more productive because it abstracts many details of the low-level SQL queries. This tutorial’s goal is to give you insights into how to interact with databases and, namely, access a PostgreSQL database engine in Python using the SQLAlchemy ORM.
✅ You can use the CoderPad sandbox in a new browser window to run the code in this tutorial — we’ve already installed the SQLAlchemy package and imported the required dependencies for you!
Install SQLAlchemy and psycopg2
If you’re using your own IDE for this tutorial, you’ll need to install
sqlalchemy library to use the ORM, and psycopg2 driver to
access the PostgreSQL database using the following pip command:
pip install sqlalchemy psycopg2
However, you don’t need to install these libraries if you’re using CoderPad sandbox as they both are already installed.
Connect to the database
Now, you’re ready to create the database engine using the following:
from sqlalchemy import create_engine
from sqlalchemy.engine import URL


url = URL.create(
    drivername="postgresql",
    username="coderpad",
    host="/tmp/postgresql/socket",
    database="coderpad"
)

engine = create_engine(url)
Note that the engine instance here is just the starting point to the SQLAlchemy application. There is no connection to the PostgreSQL database yet.
The url passed to the sqlalchemy.create_engine()
function
is created using the sqlalchemy.engine.URL.create()
function
which has the drivername , username , host , and database parameters.
If you want to experiment with that, make sure to replace the params
values with your own. You may also need to add password and port parameters if you don’t want the default values assigned to
them.
As you can see in the url object above, the username is coderpad the hostname is /tmp/postgresql/socket (which looks
like a localhost on a CoderPad instance), and coderpad is
the database that we will connect to.
To actually connect to the coderpad database, you need to use the
connect method, like this:
...
connection = engine.connect()
Define the schema
Defining a schema in SQLAlchemy ORM follows the same pattern as defining
a native Python object. You create a class that inherits from a base
class called declarative_base .
When you instantiate a base class, a metaclass is given to it that creates a Table object. Hence, a table mapper to the database is created based on the information provided declaratively in the class and any subclass of the class. Didn’t follow that? Don’t worry – you’ll see what I mean in the example below.
Now, define a table with the following:
from sqlalchemy import Column, Integer, String, DateTime, Text
from sqlalchemy.orm import declarative_base
from datetime import datetime

Base = declarative_base()

class Article(Base):
    __tablename__ = 'articles'

    id = Column(Integer(), primary_key=True)
    slug = Column(String(100), nullable=False, unique=True)
    title = Column(String(100), nullable=False)
    created_on = Column(DateTime(), default=datetime.now)
    updated_on = Column(DateTime(), default=datetime.now, onupdate=datetime.now)
    content = Column(Text)
    author_id = Column(Integer(), ForeignKey('authors.id'))
The Base object is an instance of the declarative_base()
function as we discussed and the Article class inherits from it.
The Article class is what you can use to access the articles
table. This table has six columns, each defined as attributes to the
class with the associated parameters.
Notes:
- The
slugandtitlecolumns each have anullable=Falseparameter to indicate that these fields are required. - The
slugcolumn has a self-explanatoryuniqueparam. - The
datecolumn has adefaultparameter set to the current time if the date is not specified. - The
author_idcolumn is a foreign key referencing theidcolumn in theauthorstable that you will create next.
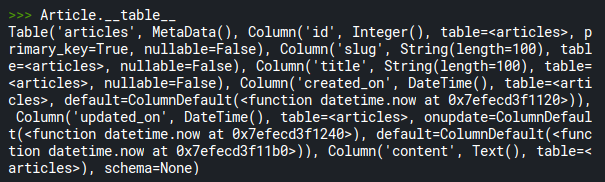
If you want to check whether the table is created or not, use the .__table__ method:
>>> Article.__table__
which returns an object of the table as the following:
Establish relationships between tables
Establishing relationships is important to model your data. There are three main types of relationships that relate tables with each other: a 1-to-1, 1-to-many, and many-to-many relationships.
Let’s say you want to model another table for authors. There will be a relationship between the articles and authors tables. For the sake of our example, an author can have multiple articles, and one article cannot be associated with more than one author. So this relationship is one to many.
Now, create one more class to represent the authors table like the following:
from sqlalchemy.orm import relationship, backref

class Author(Base):
    __tablename__ = 'authors'

    id = Column(Integer(), primary_key=True)
    firstname = Column(String(100))
    lastname = Column(String(100))
    email = Column(String(255), nullable=False)
    joined = Column(DateTime(), default=datetime.now)

    articles = relationship('Article', backref='author')
The authors table is now defined, backreferencing the author
column in the Article class. This creates a new column called author in the articles table. This column should contain the
object of the user you define in the ORM.
The articles object established the one-to-many relationship,
taking into consideration that the parent table is authors while
the child table is the first argument passed to the relationship
function ( Article ).
The value of the backref option, as explained above, basically
means that a new relationship is generated between the authors
table and the articles table. You will see how to map the author to the article when you create a new article and a new author
in the “insert data” section.
Create the tables
What we have done so far is define two mapped tables, not create them. You need to create these objects to be able to query from the tables and use them in your preferred choice.
Use the create_all() method, which requires an engine
instance like the following:
Base.metadata.create_all(engine)
Now, the two tables ( articles and authors ), which are
subclasses of the Base class, are now created in the database
defined by the engine .
To work with tables, you need to know about sessions. The following section explains that in detail.
Interacting with data
Remember that the connection to the database is ready. The SQLAlchemy ORM needs a SQLAlchemy session to interact with the database. What I mean by interaction is to be able to insert, get, update, and delete data from the database. It also includes ordering and grouping data. Let’s dive into it.
Create a new session with the following:
...
from sqlalchemy.orm import sessionmaker

Session = sessionmaker(bind=engine)
session = Session()
Insert data
Inserting data is as simple as initializing an instance of a class. You create the instance of the table definition with your desired parameters. You also need to take into consideration the required fields and the data types of each column.
Start with creating new authors. Here is how:
ezz = Author(
    firstname="Ezzeddin",
    lastname="Abdullah",
    email="[email protected]"
)

ahmed = Author(
    firstname="Ahmed",
    lastname="Mohammed",
    email="[email protected]"
)
So each instance of ezz and ahmed is now an author defined
as a Python object. Note that I used only the required fields. You can
add more arguments from the author’s schema as you wish.
Now, create the first article with the following:
article1 = Article(
    slug="clean-python",
    title="How to Write Clean Python",
    content="Lorem ipsum dolor sit amet, consectetur adipiscing elit, sed do eiusmod tempor incididunt ut labore et dolore magna aliqua. Ut enim ad minim veniam, quis nostrud exercitation ullamco laboris nisi ut aliquip ex ea commodo consequat. Duis aute irure dolor in reprehenderit in voluptate velit esse cillum dolore eu fugiat nulla pariatur. Excepteur sint occaecat cupidatat non proident, sunt in culpa qui officia deserunt mollit anim id est laborum.",
    author=ezz
    )
session.add(article1)
session.commit()

print(article1.title)
# How to Write Clean Python
After article1 is defined, you need to add the created instance to
the session using session.add(article1) . You can’t query article1 just yet. You need to commit that insert change to the
database using session.commit() .
Verify by calling any attribute of the article1 object, like the
title .
Note:
- An id is generated to the
article1instance. Check that out by callingarticle1.id. - You used the
authorto reference this article toezz.
To insert more records into the database, simply create more instances like the following:
article2 = Article(
    slug="postgresql-system-catalogs-metadata",
    title="How to Get Metadata from PostgreSQL System Catalogs",
    content="Lorem ipsum dolor sit amet, consectetur adipiscing elit, sed do eiusmod tempor incididunt ut labore et dolore magna aliqua. Ut enim ad minim veniam, quis nostrud exercitation ullamco laboris nisi ut aliquip ex ea commodo consequat. Duis aute irure dolor in reprehenderit in voluptate velit esse cillum dolore eu fugiat nulla pariatur. Excepteur sint occaecat cupidatat non proident, sunt in culpa qui officia deserunt mollit anim id est laborum.",
    created_on = datetime(2022, 8, 29),
    author=ezz
    )

article3 = Article(
    slug="sqlalchemy-postgres",
    title="Interacting with Databases using SQLAlchemy with PostgreSQL",
    content="Lorem ipsum dolor sit amet, consectetur adipiscing elit, sed do eiusmod tempor incididunt ut labore et dolore magna aliqua. Ut enim ad minim veniam, quis nostrud exercitation ullamco laboris nisi ut aliquip ex ea commodo consequat. Duis aute irure dolor in reprehenderit in voluptate velit esse cillum dolore eu fugiat nulla pariatur. Excepteur sint occaecat cupidatat non proident, sunt in culpa qui officia deserunt mollit anim id est laborum.",
    author=ahmed
    )

session.add(article2)
session.add(article3)
session.flush()

print(article1.id)
# 1
print(article2.title)
# How to Get Metadata from PostgreSQL System Catalogs
print(article3.slug)
# sqlalchemy-postgres
Now, you’ve created two more articles and added them to the database.
You’ve also flushed the session using the flush() method.
Note: Instead of calling the add() method multiple times, you
could add multiple new records like so:
session.add_all([article1, article2, article3])
Update data
Updating data in SQLAlchemy is similar to inserting. If you know the object already, it’s as simple as changing an attribute value for a Python object:
>>> article2.slug
#'postgresql-system-catalogs-metadata'

>>> article2.slug = "postgresql-system-catalogs"

>>> article2.slug
#'postgresql-system-catalogs'
Or if you don’t have the object already, you can query it using the session.query() and then filter the output, like the following:
>>> article_query = session.query(Article)
>>> clean_py_article = article_query.filter(Article.slug == "clean-python").first()
>>> clean_py_article.title = "Clean Python"
>>> clean_py_article.title
"Clean Python"
So the article_query is a query object that you applied a filter() method on to retrieve the article with the clean-python slug. Then you used the first() method to get the article
object. And then you edited the title of that article.
To check further, you can retrieve the title from the article1
object that you created before:
>>> article1.title
"Clean Python"
You can also update queries in place using the update() method.
Here is how:
>>> article_query = session.query(Article)
>>> clean_py_query = article_query.filter(Article.slug=="clean-python")
>>> clean_py_query.update({Article.title: "Cleaner Python"})
>>> clean_py_query.first().title
'Cleaner Python'
So now, the clean_py_query is a Query object. Applying the update() method on that object, as above, will update the article’s
title in place.
To query it, use first() and then see if the title is changed with
the attribute title .
This should bring us to how to query data in SQLAlchemy.
Query data
You probably noticed that we used the query() method in the
previous section. To start querying, use the session instance and
pass the class definition of your database.
SELECT
One type of query is to use SELECT * from the table to retrieve
all records. You can use the all() method:
>>> session.query(Article).all()
This retrieves a list of all Article instances in the database.
If you want to retrieve each object record, you can iterate over each object with this use case:
articles = session.query(Article).all()
for article in articles:
    print(article.title) # or any other attribute
As you can see, articles is an iterable — which is memory
intensive when you loop over, especially when the database is large.
Or you can alternatively omit the all() method and use an iterator
of article objects:
articles_objs = session.query(Article)
for article in articles_objs:
    print(article.title)
Note: I wrote a free ebook where I discussed the difference between iterables and iterators in the last chapter. You might want to check that out.
You might not be interested in selecting all columns. Here is how you select specific columns in your query:
session.query(Article.slug, Article.title)[2]
# ('sqlalchemy-postgres', 'Interacting with Databases using SQLAlchemy with PostgreSQL')
Here we select the slug and title columns and passed them as
arguments to the session.query() query. The index [2]
retrieves the slug and title of the third article in that Query object.
To retrieve the first object in the Query object, use first() :
>>> queries = session.query(Article)
>>> queries.first().id
# 1
ORDER BY
If you want to sort data in the same way that the ORDER BY clause
does in SQL, use the order_by() method on your Query object.
Take this example:
for article in session.query(Article).order_by(Article.title.desc()):
    print(article.title)

# Cleaner Python
# Interacting with Databases using SQLAlchemy with PostgreSQL
# How to Get Metadata from PostgreSQL System Catalogs
Here we list the titles of each article in descending order using the desc() method inside the order_by() method. It orders the
strings of the title column, in this example, alphabetically.
Remove the desc() method if you want an ascending order.
Conclusion
In this tutorial, you learned how to interact with PostgreSQL without
writing SELECT statements. You learned how to connect to the
database and how to insert, update, and query data.
SQLAlchemy makes developers spend less time writing SQL queries inside Python. You can use its ORM to access data in an easy and efficient way. The way it abstracts low-level SQL makes it interesting to use in production-ready environments.